In May 1995, Omega International Technology, Inc., began testing a new system to measure pipe wall thickness using digital radiography (RT) scanning. This new system has the potential for being faster, less labor intensive, and shown improved accuracy over traditional ultrasound testing, and at a lower cost. Perhaphs best of all, scanning can be performed while the pipe is in service, insulation in place.
Digital radiography refers to the process of producing and analyzing X-Ray images using electronic devices instead of traditional film. For twenty years difital radiography, in the form of Computed Tomography (CT) scanners have been used to peer inside the human body. In the past decade, digital readiography has been used to inspect critical components for military and industrial applications. Even more recently, systems employing digital radiography are being used on processing lines in the food industry as an integral part of their quality assurance programs.
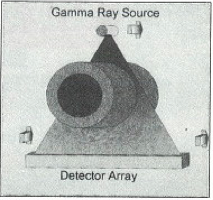
The concept behind digital radiography is similar to taking an X-Ray at a doctors office. A source, such as an X-Ray tube, sends a beam of high energy photons through the object of interest (see Figure 1). Some of the photons are absorbed by the object and the rest pass through it. The relative number of photons that are absorbed is directly related to the amount of material in the path of the photons. On the other side of the object, an array of defectors measure the number of photons passing through (the signal), producing an image on the inside of the object.

Traditionally, digital radiography has employed X-Rays to pass trhough objects, as opposed to other types of photons, such as Gamma Rays. X-Ray generating systems are bulky, require electricity, and are not very portable. Readioactive isotopes, however, are small, inexpensive, and easy to maintain. Unfortunately, readioactive isotopoes also tend to release much less energy than X-Ray systems. Most conventional detectors do not have the sensitivity to use radioactive isotopes to produce images. A new generation of detectors developed by Omega, however, are able to use very low intensity Gamma ray signals to measure pipe wall thicknesses.
The system employs an Iridium[+192] Gamma ray source and the new scintillator-based detectors instead of an X-Ray system and traditional detectors (see Figure 2). Coupled with a portable computer system, running data analysis and storage software, the entire system is mounted onto a pipeline and allowed to travel under its own power along the length of the pipe. The system automatically scans the pipe and computes the pipe wall thickness.

Source:https://inspectioneering.com/journal/1995-09-01/70/new-inspection-tool---corrosio


Nice info.
ReplyDelete